World’s Largest Zucchini

Our family likes making food, no doubt but we also like to garden. When our Zia (Aunt in english) pulled this zucchini out of the garden it was the size of my sister’s leg!

Worlds Largest Zucchini

Worlds Largest Zucchini

And because bananas are a standard scale on the internet:

Worlds Largest Zucchini

Worlds Largest Zucchini

Enjoyed this post? Follow us on instagram

Recipe: Vanilla Cream Cheese Frosting

Vanilla Cream Cheese Frosting:

Vanilla Cream Cheese Frosting:

My sister makes these amazing cupcakes and frosts them with Vanilla Cream Cheese Frosting. The best part is the frosting so here is the recipe. Enjoy!

Ingredients

  • 1 (8 ounce) package cream cheese, softened
  • 1/4 cup butter, softened
  • 2 tablespoons sour cream
  • 2 teaspoons McCormick Pure Vanilla Extract-16 OZ (affiliate link)
  • 1 (16 ounce) box confectioners’ sugar

Directions

1. Beat cream cheese, softened, butter, sour cream and McCormick® Pure Vanilla Extract in large bowl until light and fluffy

2. Gradually beat in confectioners’ sugar until smooth.

3. Frost with Vanilla Cream Cheese Frosting.

Recipe: Tomato Risotto

Tomato Risotto

Tomato Risotto

Time: 40 – 50 Minutes
Difficulty: Medium
When: Dinner | Date

My Experience

My sister doesn’t like risotto, but she loves my tomato risotto. She even rated it a 10 out of 10 and she can be a tough cookie when rating my food. I warn you though, this recipe is about patience and being in three places at once.

My Suggestions

  • Coat the rice in oil before adding liquid to help it absorb the liquid slowly without becoming soggy
  • Add the chicken or vegetable stock gradually (one landfill at a time)
  • Prepare the tomatoes by cutting them into 3 pieces before hand
  • Do not add too much parmesan

Ingredients

  • 2-3 tablespoons of olive oil
  • 200 grams of arborio rice
  • 500 millilitres of chicken or vegetable stock
  • 50 grams of unsalted butter
  • 250 grams of cherry tomatoes
  • 100 grams of marscapone cheese
  • 25 grams of parmesan cheese

Directions

1.  Prepare the rice.  Heat the oil in a large frying pan, add the rice and stir well to coat the grains in the oil.  Bring the stock to a boil and add 1 ladleful of it at a time to the rice, stirring well after each addition, until the liquid has been cooked but still al dente.  This will take about 15 to 18 minutes.
2.  Prepare the tomatoes.  As you prepare the risotto, heat the butter in a small saucepan, add the tomatoes and gently cook for about 10 minutes until soft.  Pass through a mouli or coarse sieve; alternatively mash with a potato masher.
3.  Finish the dish.  When the rice is cooked, fold in the mascarpone, Parmesan and the tomato mixtures, adjust the seasoning and serve.

Recipe by Gordon Ramsay

Recipe: Bacon Cinnamon Rolls

Bacon cinnamon rolls

Bacon cinnamon rolls

Time: 40 – 50 Minutes
Difficulty: Easy
When: Breakfast

I love this recipe because it simply requires two ingredients!

My Suggestions

  • Serve warm for best taste
  • Fry the bacon for only a few minutes (do not fully cook!)
  • Do not overcook the cinnamon rolls or the bottoms will burn

Ingredients

  • 1 can Pillsbury Grands! Cinnamon Rolls (5 count)
  • 5 bacon strips

Directions

  1. Preheat oven to 350 degrees.
  2. Heat a skillet over medium-high heat. Place bacon strips in skillet and fry for 2-3 minutes until still soft but slightly cooked. Remove bacon and pat dry with paper towels.
  3. Pop open the can of cinnamon rolls and unroll them into long strips. Lay one strip of bacon on each cinnamon roll strip, then roll them back up. Place each bacon roll in a greased pie pan.
  4. Cook according to package instructions, then drizzle with icing from the package.

Recipe by: Gimme Some Oven

How to: How do you coat perfectly round truffles with melted chocolate?

Question

How do you coat perfectly round truffles with melted chocolate. Preferably with the least amount of mess. Normally, I just dip the truffle into a bowl of melted chocolate and remove the truffle with a spoon. I then will place them on a sheet of wax paper.

However, this leaves my truffles looking …well not so round. The chocolate drips down causing the truffle to have a flat surface. And the ball is not smooth.

The recipe I am following can be found here and an example is shown below:

Mint Oreo Chocolate Truffles

Mint Oreo Chocolate Truffles

Answer 

I don’t know about perfectly round, but you can do better.

Stick toothpicks in the truffles before dipping. Dip them using the toothpick, let it drip enough to make sure there’s not a ton of excess, probably while spinning it a bit to let it cool slightly and make sure it doesn’t all accumulate in one place. Then stab the other end of the toothpick into something to hold it with the truffle at the top. (A block of foam works, as does cardboard, though you might need to pre-poke holes.)

This avoids having a lot of excess coating chocolate, which it looks like you’re getting a lot of when scooping out with a spoon. There can still be a little excess, but it’ll drip down the toothpick, not get smeared all over. It also avoids having to mess up any of the surface by touching it with the spoon.

Beyond that, they’ll be as perfectly round as you managed to roll the centers, which is mostly just a matter of a bit of practice and obsessiveness. So they won’t be perfectly round, but they’ll be a lot smoother and rounder, definitely enough to impress people. You do get a small hole on one side of the truffle, possibly with a tiny bit of excess chocolate around it where it collected against the toothpick, but I don’t think that’s terribly ugly. Plus as long as a decent fraction are pretty, you can just eat your mistakes.

Here’s what a friend and I managed on our first try:
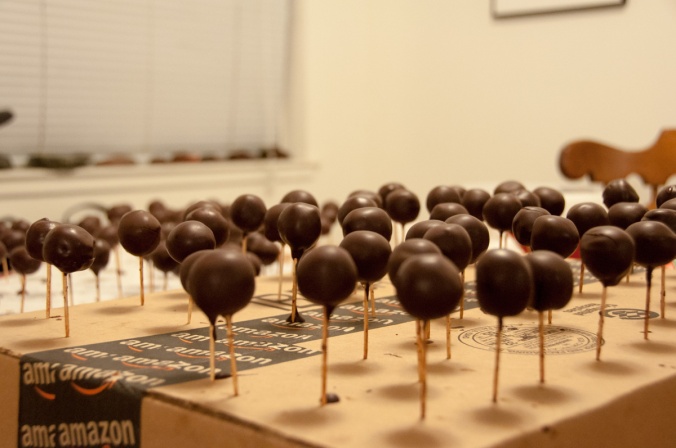
Truffles

Truffles

As you can see, they’re definitely not perfect. But we got better at it as we went along. A lot of the irregularities are from initial inexperience, variation in chocolate temperature (we didn’t have a great water bath or hot plate setup), and simply not having terribly round centers.

Finally, you might want to practice tempering the chocolate a bit better. Having nice glossy smooth surface makes them look a lot cleaner even if they aren’t perfect.

Source: I asked this question on cooking.stackexchange.com

Recipe: Stuffed Baked Tomatoes with Ricotta, Sweet Corn and Pesto

Time: 40 Minutes
Difficulty: Easy
When: Appetizer | Snack | Lunch

My Experience

I made this recipe awhile ago so be aware that my experience is a bit forgotten. Nonetheless, I really love this recipe for its unique aroma and taste. The smell of basil makes this recipe an absolute favourite. More importantly it is a great vegetarian option!

My Tips

  • Do not overcook the tomatoes or they will become dry
  • I always say this: taste, taste and taste as you mix the ingredients to ensure a perfect taste
  • Use a spoon or knife to scoop the insides of the tomatoes (I would reuse the insides in the mixture or for a salad)

Ingredients (makes 12 pieces)

  • 6 small tomatoes
  • 8 tbsp Ricotta cheese
  • 3 tbsp Parmesan cheese
  • 3 tbsp store bought pesto
  • 2 cloves Garlic, minced
  • 6 tbsp Sweet corn
  • Salt, pepper (keep in mind that the parmesan and pesto already have salt)
  • 10 tbsp Bread crumbs, I used Italian garlic and herb bread crumbs.
  • Butter or olive oil

Directions

Preheat oven to 400 f.Cut the tomatoes in half horizontally. Scoop out the flesh using a spoon. Dab the tomato cavities dry (See pictures above). In a bowl, mix together all other ingredients except tomatoes, bread crumbs and butter/olive oil.  Spoon this mixture into each tomato half. Top with bread crumbs (approximately 1 tbsp breadcrumbs per tomato half). Gently pat the bread crumbs down. Drizzle a little butter or olive oil on top of the stuffed tomatoes.

Place stuffed tomatoes in a buttered or oiled baking dish. Bake for 15-20 minutes. Then turn the oven to broil and broil till the tops are golden, about 1 minute.

Recipe by veggiebelly

Follow me on instagram

Recipe: Mint Oreo Chocolate Truffles

Mint Oreo Chocolate Truffles

Mint Oreo Chocolate Truffles

Mint Oreo Truffles Ingredients

Mint Oreo Truffles Ingredients

Time: 2 hours
Difficulty: Medium
When: Dessert | Big Dinner | Potluck

My Experience

I learned a few tips making this recipe:

  • Melt the chocolate in a double boiler (or use two pots on top of each other)
  • Do NOT get any water on the chocolate chips or it will turn out clumpy when melting (wipe your pot dry)
  • Quickly dip the oreo balls into the melted chocolate before it turns clumpy

Ingredients

  • 1 Pack Mint Oreo’s (14.3oz)
  • 1 bar cream cheese (8oz)
  • 2 packs chocolate chips (~24oz total)

Directions

  1. Grind oreaos in a blender or magic bullet
  2. Add cream cheese and mix together oreos and cream cheese by hand into a BIG ball.
  3. Freeze for 30 minutes.
  4. Turn big ball into small balls. Freeze for 30 minutes.
  5. Melt chocolate chips using a double boiler or the microwave
  6. Drop the small ball of oreo goodness into the pot of chocolate. Remove with spoon.
  7. Freeze.

Recipe inspired by imgr


Recipe: Chinese Tea Eggs

Time: 2 – 10 hours (depending on seeping)
Difficulty: Easy
When: Brunch | Breakfast | Snack

My Experience

It took three attempts to get this recipe right. A few tips I learned along the way:

  • Seep the eggs overnight for best effect
  • Use Chinese five spice powder for more flavours (I did not!)
  • Crack the eggs enough so the sauce can enter
  • Do not use green tea, use black tea
  • Simmer or refrigerate overnight
  • Use the back of a spoon to crack the eggs

The pattern is unique, but the taste is not much different than regular boiled eggs. This might be due to the absence of Chinese five spice powder which I did not use.

Ingredients

  • 6-8 eggs
  • 4 table spoons of loose black tea leaves
  • 2 table spoons soy sauce
  • 2 table spoons salt
  • 1 tea spoon Chinese five spice powder (adjust according to taste)

Directions

  1. Boil eggs for 12 minutes until they are thoroughly cooked. Afterwards set eggs aside in cold water to let them cool down.
  2. Once eggs are cooled, crack the shells of the eggs, but make sure not to let the shell come off the eggs. Make sure to make cracks all around for a prettier cracked egg shell look as a result. This is tricky, what you want are cracks that are deep enough for the taste to get into the eggs, but not to much to the eggs shells won’t fall of the egg itself during cooking.
  3. Lay the eggs in a cooking pot and fill water to about one inch or 2.5 cm above eggs. Add more water later on if needed.
  4. Bring to boil the water with black tea leaves, salt, soy sauce and chinese spices. The latter you can usually find in any grocery store. If not, check out your local asian supermarket. If you can’t find this at your local asian grocery store.
  5. Cook the tea eggs for two hours (this is really the minimum) with all the ingredients on a low simmer. Keep lid on, this will avoid the liquid mixture from evaporating.
  6. Afterwards let the pot cool down and let the boiled tea eggs sit overnight for about 8 hours) in the fridge to fully absorb the flavors.
  7. The next day, you have to boil, and cook at a low boil for an additional 1-2 hours.

Recipe by teasenz.com

Recipe: Easter Kit Kat Cake

My Zia (aunt) baked this amazing cake for easter and I really wanted to share the recipe!

Ingredients

  • your favorite cake
  • your favorite icing
  • 22 (.49 oz. size) Kit Kat bars (I bought 3 packs of 8 of the snack size)
  • sweetened coconut flakes (I used about 1/3 to 1/2 of a 14 oz. bag)
  • green food coloring
  • Cadbury Mini Eggs
  • ribbon

Directions

1. Bake your favorite cake recipe for a two-layer, 8″ or 9″ cake. (For this cake, I used Duncan Hines yellow cake mix.) Make sure to even out your layers so there’s some room left at the top for your coconut.

2. Frost with your favorite icing. (For this cake, I used Duncan Hines chocolate icing.)

3. Press the Kit Kat bars around the cake gently.

4. Place the coconut in a zippered plastic bag. Add drops of green coloring (I used 4) and close the bag. Shake until the color blends evenly. Add more coloring if necessary.

5. Sprinkle the coconut over the top of the cake. Add the mini eggs.

6. Tie a ribbon around the Kit Kat bars.

Inspired by sohowsittaste.com

Recipe: Apple Tart With Ice Cream

Time: 30 – 40 Minutes
Difficulty: Easy
When: Dessert | Big Dinner | Brunch

My Experience

I made this dessert for a company dinner and it was a favourite among the group. As a relatively simple dessert that requires few ingredients I suggest it for any small to medium sized get together. For larger groups this dessert cannot feed more than 7 people.

The hardest part is thinly slicing 3 apples (a sharp knife helps – thanks Mr. Wong!). Also, I used too much sugar so be careful not to overdue it. Lastly, serve warm and with ice cream!

Ingredients

  • 250g puff pastry
  • 3-4 Braeburn apples
  • 20g unsalted butter, melted
  • 1-2 tbsp golden caster sugar
  • Icing sugar to dust

Directions

1.Heat the oven to 200˚C/Gas 6. Roll out the puff pastry thinly on a lightly floured surface to a 2mm thickness. Using a 13cm plate or saucer as a guide, cut out 4 rounds and place on two large baking sheets. Prick the pastry all over with a fork to stop it puffing up.

2. Peel, core and thinly slice the apples.

3.Arrange the apple slices in a circle on top of the pastry discs, overlapping them slightly, placing 2 rings in the middle to finish. Brush them with melted butter and sprinkle with a fine layer of caster sugar.

4.Bake the tarts for 10 -15 minutes until the pastry is cooked. Dust with icing sugar and glaze with a blow torch.

5.Serve the tarts warm, with a scoop of caramel ice cream.

Recipe by Gordon Ramsay